Release 0.3 – More bugs (?!) to fix..

Hello everyone. As this is my last assignment, this will also be my last blog for my open source class (but hopefully not my last blog for life!). This time, I’ll be talking about Release 0.3. The instructions are essentially the same as Release 0.2 – except this time, try to work on at least more than one bug, so I’ve worked on two bugs.

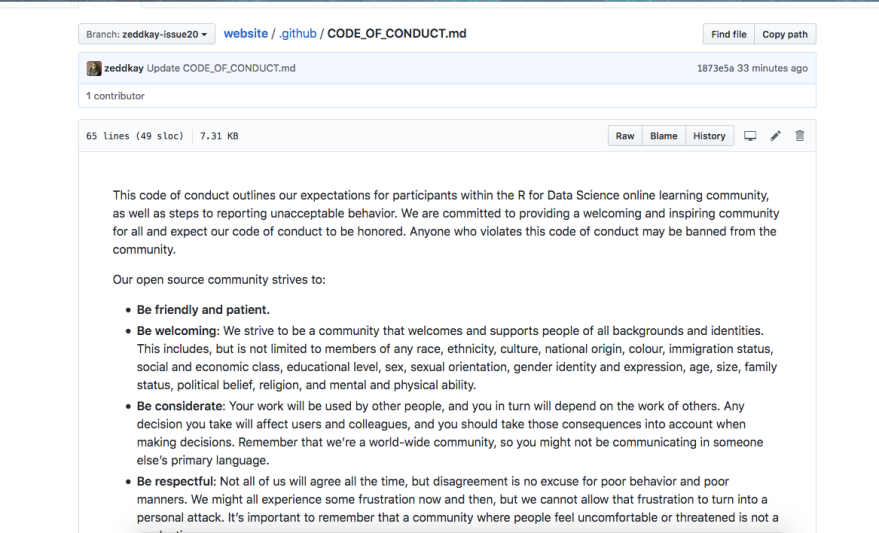
First, I scoured the internet for open github issues. I eventually found this issue in a random github repo (R for Data Science Online Learning Community), and decided I’d try it. It essentially gave a github documentation link, as well as a link to a code of conduct example, and asked for a code_of_conduct.md to be created. It wasn’t necessarily a coding task, but documentation is important as well, nevertheless. So, I forked the repo, and created a code_of_conduct.md file in the repo’s .github folder, in which I copied and converted the code of conduct (to markdown) from the attached website. After including the group’s contact info and such, I created a PR.

Screen Shot 2018-04-21 at 10.14.28 PM.png
the code_of_conduct.md file I created

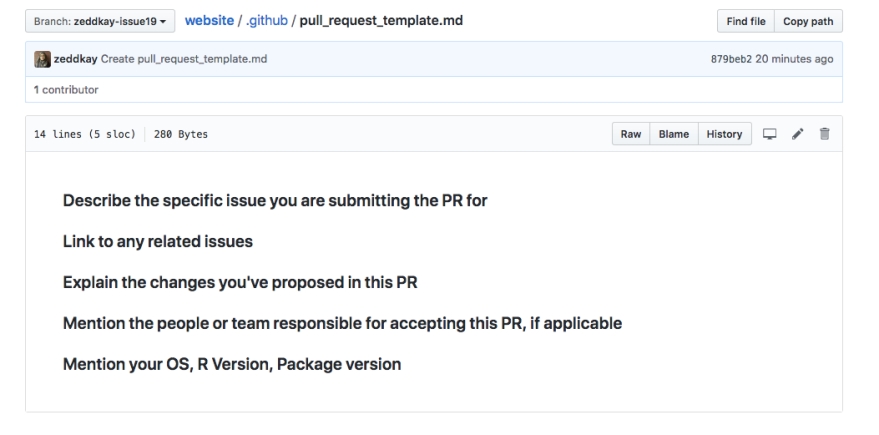
So, that was one issue down. Now I had to find at least one more. I was just about to do a google search for another issue, when I realized this group may have more issues to fix. And voila, they did. The next issue I tackled was also a documentation issue – create a pull request template. I didn’t even know you could set a template for users submitting pull requests to your repo, but hey, you live, you learn, right?

And so, using the link mentioned in the issue, I followed essentially the same steps as above – creating a new markdown file in the .github folder. I looked at other PR templates, as well as this group’s existing issue template, and put it together. After doing that, I created another PR (not using the template yet), and am thus done with two PR’s for the same repository, which is a new step for me! I may contribute to another issue once I get feedback on these 2 PR’s, but in the meantime, I’ve learned that PR’s can be fun, even if it’s not code you’re modifying! As for growth, I’d say I grew over the span of Release 0.2 and 0.3 by contributing to two issues, rather than one, and choosing documentation/writing issues rather than fixing code. One thing’s for sure, I’m glad to have been introduced to how easily you can contribute to the world of open source, by something as simple as fixing issues on Github.

Screen Shot 2018-04-21 at 10.21.55 PM.png
The pull_request_template.md file I created

Fixing a Bug, Adding Tests

Hello all, for lab 6, we were asked to fix a minor bug that existed in the Brave browser-laptop code. The bug itself was that Brave reacts differently to spaces inside search queries or urls. For this case, we tested some strings inside Brave, versus Chrome and Firefox. Upon entering this url inside the url bar, while Chrome and Firefox returned a Google search page for “dog cat”, Brave returned a Google search for the entire URL itself. The instructions were to fix that bug and write new tests to test that the bug was indeed fixed.

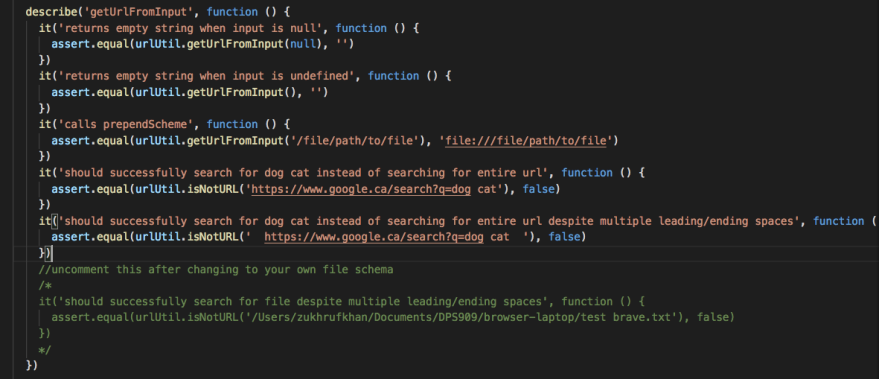
So, I started off by forking the Brave repo, and cloning it to my machine. After building and running the code, I also ran the tests and made sure everything was working smoothly. I noticed that when I entered: https://www.google.ca/search?q=dog cat into my Firefox or Chrome browsers, the space between dog and cat was replaced with %20. In Brave, nothing was replaced and so the whole URL was placed in a Google search rather than the two separate terms. So first, as per the instructions, I familiarized myself with the tests in urlUtilTest.js, and wrote some more tests to test the fix I was going to make later.

Screen Shot 2018-04-15 at 10.18.43 PM
I added the last 2 tests (and the final commented one)

Thus, I made my way through the urlUtil parsing code in this file. I ended up simply adding a replace(‘ ‘, ‘%20’) to one particular line of code, and voila, I was done!

Screen Shot 2018-04-15 at 9.47.04 PM

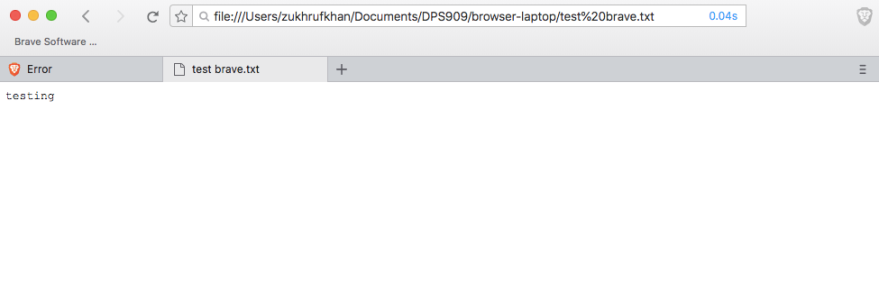
Afterwards, I tested the browser, and sure enough, Brave replaced the spaces with ‘%20’ and thus treated the URLs as Chrome and Firefox do.

Screen Shot 2018-04-15 at 9.49.02 PM
Testing Brave with a file called test brave.txt – the spaces were replaced and the file shown


Screen Shot 2018-04-15 at 9.47.46 PM
Successful tests!

My commit can be found here. I learned that sometimes, it only takes a line (or less) to fix a bug (although the tests were another case).

Release 0.2 – The Aftermath (Part 2)

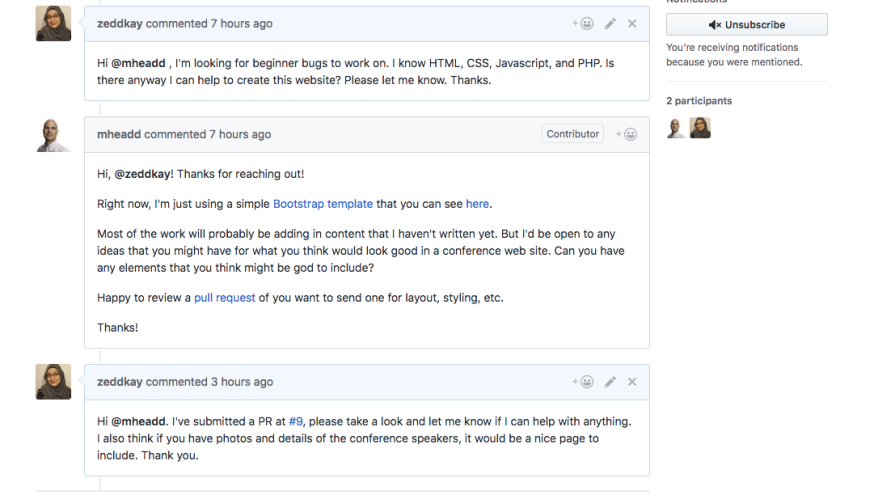
So, in my previous blog post, I described the small project and bug I decided to work on. Well, I went ahead and started to work on it.

Screen Shot 2018-03-26 at 9.58.04 PM
The comment I left on the bug

Since it’s a basic HTML/CSS site with the use of a Bootstrap theme, and there was no specific tasks outlined, I decided to make my first PR have just a few changes that I thought a conference-type website should have.

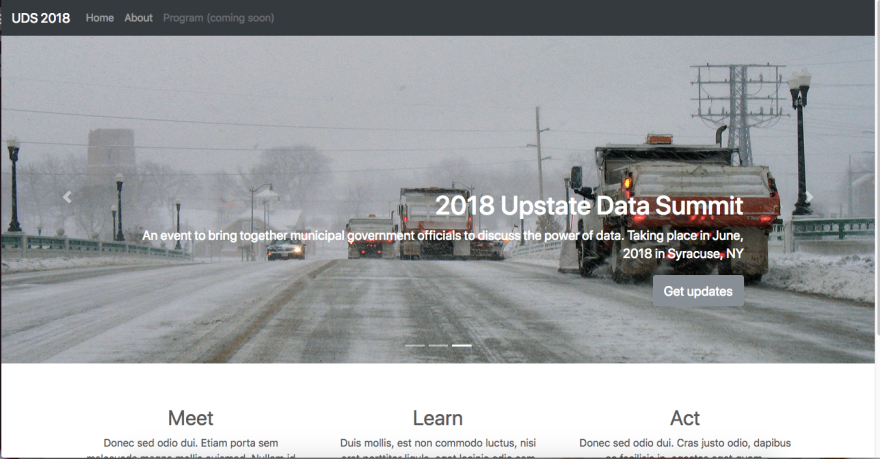
This is what the website looked like before:

Screen Shot 2018-03-26 at 10.00.16 PM

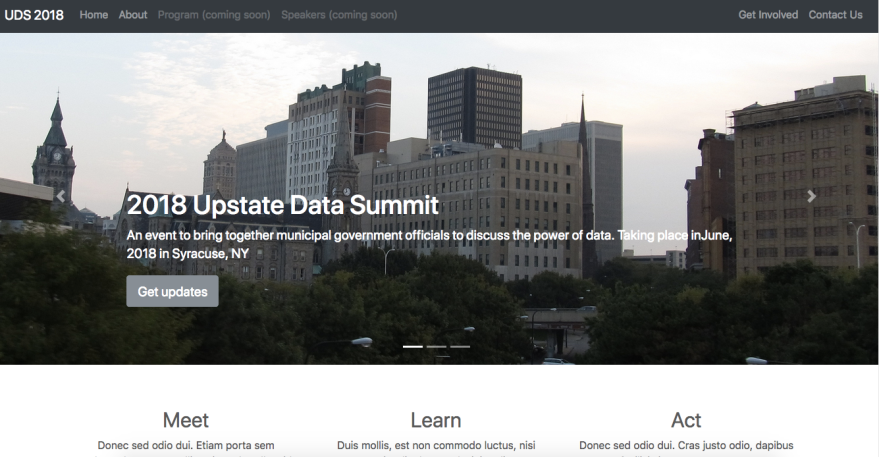
The above page (index.html) was the only page on the website (the About navbar link pointed to the README inside the github repo, rather than its own webpage). Since I was allowed to style the website in any way I saw fit, I decided to create three more pages: About.html, getInvolved.html, and Contact.html. In these three pages, I decided to just copy and paste the information inside the repo README. I created another navbar link for Speakers, but put it as blank since there was no information regarding the Speakers inside the README. And voila, that’s all I did for my first actual pull request in a public project! I’m still awaiting a response, as I would like to make an interactive Speakers webpage that includes the names, photos, and descriptions of each of the conference speakers, and maybe an interactive timeline of the program information (agenda/timings) as well.

Screen Shot 2018-03-26 at 10.06.57 PM
The website now. The new navbar links contain the info that was already inside the README

For now, that is my first PR description. However, I hope to contribute some more on this project, as I’ve never actually worked on a website outside of schoolwork, and that definitely needs to change. I learned that you can use github pages easily and quickly to host HTML/CSS and Javascript, but not PHP, which I found out after trying to import the navbar html code into a seperate php file that I could then just include in the beginning of each html file. While this issue wasn’t a very specific, error-causing bug, it was still fun to work on because now I know that you can just drop a comment in a random issue with a help-wanted label and start helping out. Here’s to hoping I get some good feedback on what else I can contribute to the project!

NOTE: this blog post may be updated later if my PR is accepted and/or I receive feedback on what to do next!

Release 0.2 – Introduction (Part 1)

Hello all, this (late) blog post will serve as my introduction into Release 0.2. I spent a good 3+ hours or so looking for good beginner bugs, in various projects, focusing on languages such as HTML, PHP and Javascript. I scoured many lists of repos that had beginner bugs, and somehow found myself a few bugs that I thought I could handle. One of them is an old issue in Brave, that no one has submitted a PR for yet. Another is a website edit for a music player that is no longer being updated, called Tomahawk. After commenting on both issues, I found myself something I was more interested in: a small project that had some help-wanted labels.

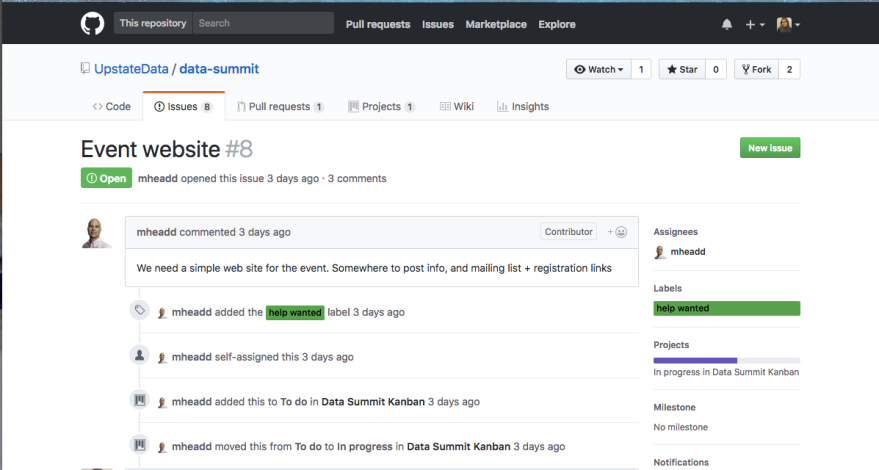
I zoned in on the one bug I could actually do some coding for: helping to create a basic website for an upcoming conference. The project repo is here: Upstate Data. It is essentially the repo to hold the code for a github pages website on an upcoming conference known as the Upstate Data Summit, to be held in June, in Syracuse, New York. The code consists of 80% HTML, and 20% CSS, which is pretty straightforward to work with, since both are relatively simple languages (especially considering the fact that many open issues out there are not easily fixed using just HTML and CSS). There are a few issues in the repo, but most of them are in regards to gathering information about the conference itself. The most recent issue, the one that I’m interested in, asks for the following:

Screen Shot 2018-03-26 at 9.38.11 PM

So, I took a look at the rest of the repository, and found that the website was being hosted with github pages, a tool I had never utilized before. In addition, there is only one contributor to the project, so I’m sure he could use some help, judging from the help-wanted label on the issue. After leaving a comment on that issue and promptly receiving a reply welcoming any PR’s or suggestions on what the website should include, I’m going to try to create at least one PR for this repo. I will update you with the results in my next blog post!

Trying to fix an(other) Issue…

For this lab, we were asked to implement a solution for a day/night scheme for Professor David Humphrey’s app. The issue he created is here, and asks for an automatic solution without the use of a button, that will change the lighting setting of the app according to the time of day in your location.

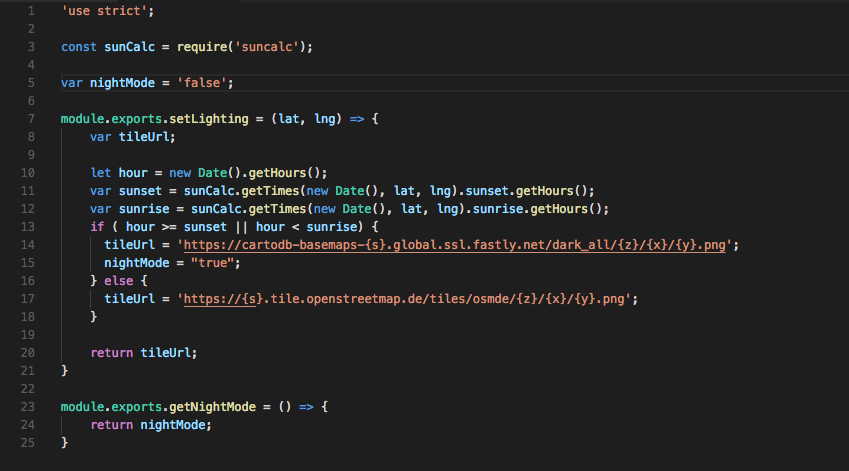
Professor Humphrey mentioned an open source tool called Suncalc, so I set out to use it. It wasn’t very difficult to incorporate into the app, but the only major issue I had was actually figuring out where to put it. I started the lab late, and after looking through the solutions my classmates had already posted, I realized that there had been many commits in the repo I forked to start off, versus their repos. Thus, I first inspected the code in the src folder, and eventually figured out that the map was initialized in the map/base-ui.js file. In there, I included Suncalc, determined if the current hour was after sunrise, or sunset, and used it to change the Leaflet map system to a darker map. I thought I was all done, until I reread the instructions, and realized I needed to import that code into a separate module, which I called lighting. After fixing that up, I set out to change the current location icon color (I initially thought it had disappeared, because I couldn’t see it with the black theme). I did this by including a nightMode variable inside lighting, as well as a getter function.

Screen Shot 2018-03-26 at 12.35.48 AM
My Lighting Module

Back in my base-ui.js file, I realized that changing the icons might not be as easy as I thought. For starters, I had no idea where to get the icons from. I looked at the SVG icons inside the icons folder, and looked at the actual svg files, and was utterly confused. Then, after a few seconds of staring at the fill color item, I decided to simply change it to “white”, and see if my icon turned white. And voila, it actually did!

Screen Shot 2018-03-26 at 12.41.41 AM
Top: Regular Black Locked Icon Content / Bottom: A Simple Edit for a White Locked Icon

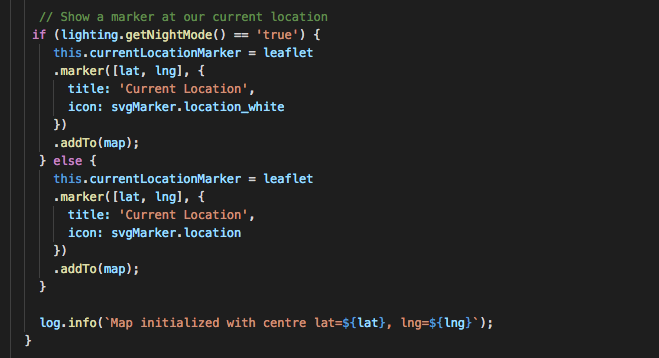
So, I created some new SVG’s for the location, locked, and unlocked icons, and saved them with the others. Now, instead of just using the regular location icon to mark the current location in the map, this logic determines whether to use the black or white icon depending on the nightMode of the map:

Screen Shot 2018-03-26 at 12.39.11 AM.png

Similar logic is implemented inside the troll-bridge.js file, for the locked and unlocked bridges icons (it took me some time to find that code). And thus, I  (hope I) have implemented a fix for the lighting issue. My code repo is here: Issue 6. Overall, I’d say this was a very interesting lab. I’m glad to have learned a bit more about working with node.js through this lab, and using test suites like eslint and prettier was pretty cool as well. Thank you for reading.

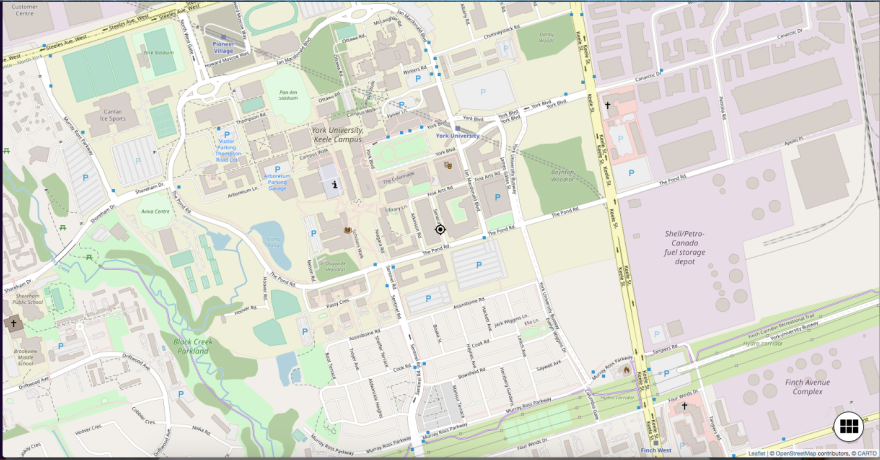
Screen Shot 2018-03-26 at 12.14.27 PM.png
Map in daytime mode (I changed the default daytime leaflet map)

Open Standards and Tests

Hello all, for this lab, we were assigned to read and learn of some test suites in open standards. In this case, it was ECMAScript, a language I had never heard of before. After being given an overview in class, we ran the ECMAScript test suite on our own personal machines. Like many others in my class, all of my tests didn’t pass (6 failed), but seeing as so many others had the same results, I didn’t lose any sleep over it.

After examining the previously-written tests at this link, we were asked to write some test cases of our own as practice. Essentially, I was tasked with converting the tests for TypedArray types to test cases for regular Array types. I looked through the Array and TypedArray tests, and eventually settled on making a few minor changes to the tests in this file. In the end, I ended up with the tests in this file. Overall, in this lab, I learned how to alter tests to help them conform to new test cases.


(Trying to) Fix A Bug in VSCode

Hello all,

For this blog post, we were assigned to research and if possible, fix a bug in Visual Studio Code. Let me start off by saying, wow, did I underestimate the difficulty level of not just fixing a bug, but trying to even find a good bug to fix. After scouring the open issues with the label of ‘bug’ (and other labels as well), I came upon a few that seemed like good first bugs.
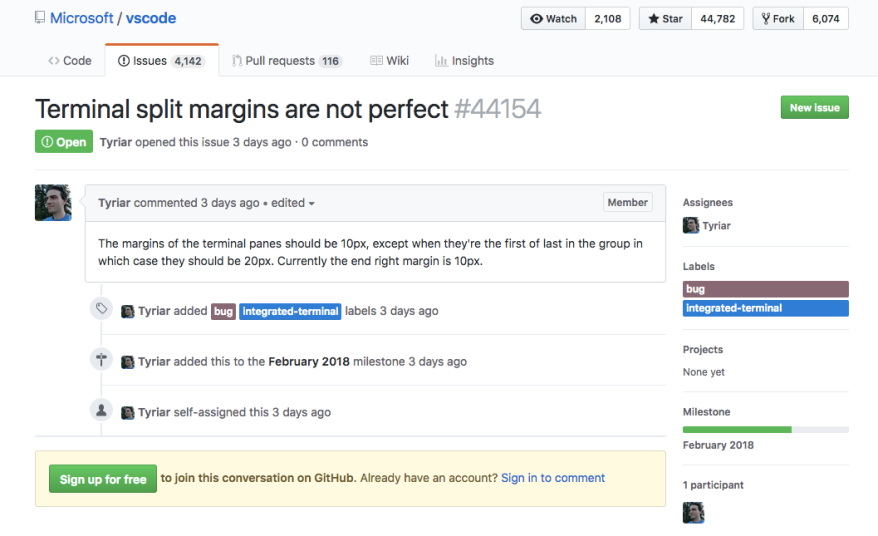
The bug that I found was in regards to the integrated terminal layout. It required that the width of the terminal margins be altered. Easy enough, right? Well, the issue didn’t have much detail, or a photo, so I set about trying to adjust the margins.

Screen Shot 2018-02-24 at 10.20.16 PM

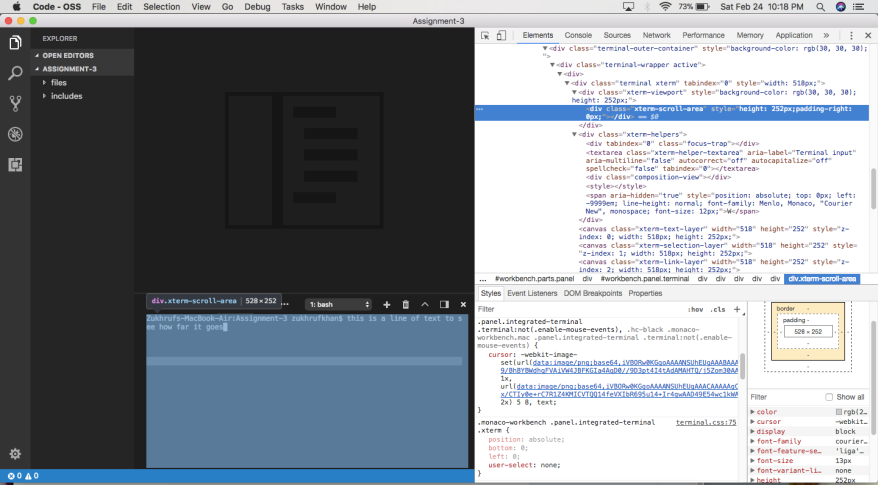
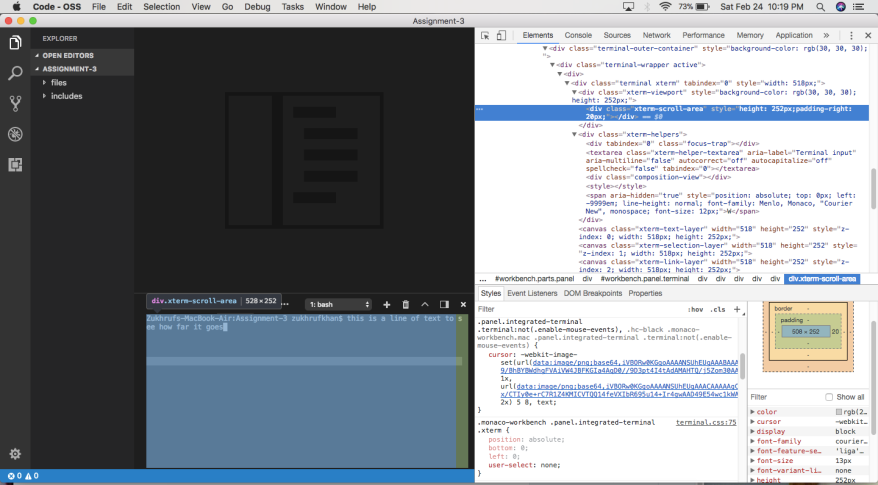
Well, one crucial detail to help me find the place to start is the fact the “end right margin is 10px”. So, I toggled developer tools, opened the integrated terminal, and went about selecting various div elements inside the terminal window, to see the margin settings.

I searched for “right” within the code, and couldn’t find any right margin of 10px. I tried the terms “margin” and “10px” as well, but to no avail.

Screen Shot 2018-02-24 at 10.18.43 PM

I tried modifying some of the left and right margins that I did find, but none of that seemed to make any difference. In the example below, I thought I had caught on to something by setting the right padding to 20px, but it seemed to only be affecting the scrollbar margin, and not the margin the issue was describing.

Screen Shot 2018-02-24 at 10.19.12 PM

Well, after some time of searching around and experimenting with different numbers, I decided to give up. The issue wasn’t detailed enough for my liking (no indication of OS or VSCode version either), and so, despite me thinking it would be a piece of cake to fix, I decided to call it a day.

Now, I’m thinking of tackling this issue regarding an unnecessary confirmation prompt. The good thing about it is that it has more details, and someone even provided a code pointer. We’ll see how it turns out…

Installing Visual Studio Code (AGAIN)…

Hello all,

Recently, we’ve learned a bit about Visual Studio Code as an open source project, as part of Lab 2. Ironically, I’d only heard of and started using VSCode about a week ago, when a friend showed me how sleek and appealing the program looked, plus the fact that if you create a new html file, and type html 5, it will generate the basic tags and outline of an html page. While there may be other text editors that do that, I’m still getting the hang of my Macbook Air, so I’ve been using TextWrangler, and let me tell you, that html trick alone won me over and I installed VSCode right away. So for the past week, I’ve been using it as a basic text editor, and had no idea that it was an open source project, or that I can even contribute to its development!

So, as per the lab instructions, I followed these steps to install VSCode as a developer: How to Contribute. I already had npm installed, and installed Yarn via Homebrew. After going through the rest of the steps, the build ran without any problems, and after about 8 minutes of what seemed like hundreds of downloads and installs, I navigated to the vscode folder and typed inside the terminal:

./scripts/code.sh

and voila! A new instance of VSCode, with a different icon from my current installation came up. I closed and reopened the program via the terminal. I spent a good 10 minutes trying to copy that command into an alias (apparently I was missing my bash_profile text file), and now, I just need to type vscode from my terminal, and it will show up!

After that, I executed the test script using this command:

./scripts/test.sh

Unfortunately, one of my tests is failing, and I’ll be researching to figure out why. I did try running the test multiple times, but to no avail.

Screen Shot 2018-02-13 at 6.41.18 PM
Well, a pass:fail ratio of 3866:1 is still pretty good, right?

Aside from that, I am excited to learn more about VSCode. So far, I have not installed any extensions, but seeing as it’s only been a week that I’ve been using VSCode and I’m learning more about its capabilities, it won’t be long before I do. I look forward to using VSCode and hopefully, fixing a bug in it as well!

My first Open Source Project

Hello all, today I’ll discuss my experience of working with an open source library for the very first time.

I won’t delve too much into the details and requirements of this assignment, you can see them at Release 0.1. Keep reading for more information on how I tackled this project.

What I Built

For this assignment, I built a simple web service using Node.js, Express, and an npm package called google-libphonenumber. It’s basically a simplified version of Google’s libphonenumber library, that I used to parse and validate phone numbers in text snippets and text files. My project code in its entirety can be found here. Basically, it supports two types of data requests – to start off, you have to run the project, navigate to the correct url (as is in the github readme file), and then do one of two things – either provide a string containing a phone number inside the url box (which is a get request), or use the file upload url, which will take you to an upload file form, where you can browse and upload a text file from your machine. If you provide a string through the url, it will parse one phone number and display the JSON array output (more numbers will be parsed only is you use a delimiter of ; or ,), and if you upload a text file, it will parse the entire file (with delimiters of ; or , or line breaks).

The Process

Since we were allowed to use any programming language we wanted, I was very confused as to what to use (most assignments I’ve done were to be completed with one specified language, that we were all familiar with). When peers started discussing various frameworks and languages I had not used much before (or at all), I was even more confused. Since some people said they’d like to use Javascript, I thought “oh well, this isn’t too bad, I learned Javascript in web development in 2nd semester, so I can do that”. But no, apparently you had to use Node.js, which I was not familiar with at all. I had installed node.js on my machine some time ago, but had never gotten around to using it. Looks like that had to change.

Thanks to Professor David Humphrey mentioning using node.js with a framework called Express, I was able to learn how to set up a simple web service, and after more research, learned how to incorporate libphonenumber into my project.

Tools, Languages, and Dependencies

As I mentioned above, I used node.js, express, and eventually, multer for handling the upload and data content of text files. I used these tools because they seemed to be the most popular and commonly used tools for this sort of project, and also, upon glancing at my classmates’ repos, I found that many of them were also using these tools at well, so I had to be doing something right.

For testing purposes, I was also introduced to two new dependencies: mocha, and chai. I used these because they were well known, and many of the node.js tutorials I had read included them for testing.

Challenges

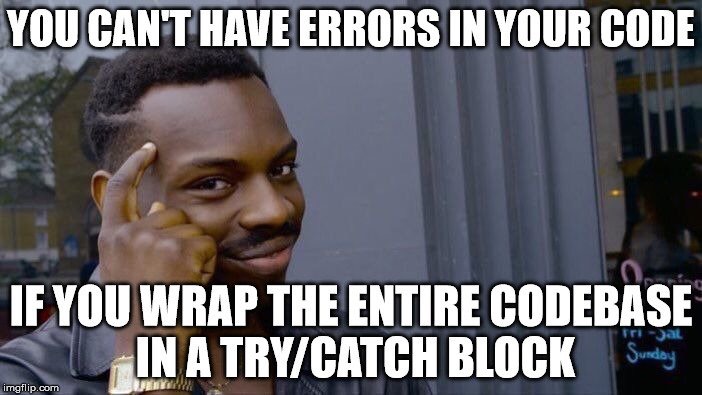
Of course, creating a web service in node.js was not an easy task, since it was my first time and I had not been taught the basics by anyone beforehand. Since it’s javascript based, and there’s a ton of tutorials out there on creating web services, I didn’t find it to be that bad. Ironically, the few serious errors I did have, were just syntax or spelling errors. One of these dumb errors happened near the beginning, when I thought I had included google-libphonenumber, but had actually included a slightly different library called libphonenumber-js. After figuring that out, things went well. My next dumb error had to do with file handling – I had named my file as ‘upload’ in my upload.html file, but gave it the name of ‘file’ inside my server code, so the file couldn’t open. Of course, I laughed like a maniac when I figured out that was the error (took me a good two hours at least). Other than those two dumb errors, I didn’t run into any major challenges (inserting a try/catch block fixed most of my errors).
7VEnJlJHao8L63xOMOnlXJylh6-S3hEWFNV3HW_zHFU

Maintaining vs Contributing

After finishing my code, I had to fix two issues in my peers’ repos. While most of us had posted the same issues, I did find two issues, one regarding parsing phone numbers without text, another regarding returning a unique array of phone numbers. They were easy to fix, because I had already struggled and figured out both issues when implementing my own project. Thus, I would say that contributing to someone else’s repo was more fun, provided you had already solved the same issue in your own code. When you go through an experience yourself, it’s fun to help someone through the same problem. Plus, it was the first time I had created a pull request, so that was nice.

What I Learned

I learned that even though the first glance or reading of an assignment’s instructions may seem terrifying (I had contemplated dropping the course at first), once you actually start to research and read into its specifications, it’s really not that bad. I also learned that I shouldn’t shy away from writing a program in a language I had never learned before, because I might just surprise myself at the end.

What I Want to Learn More About

I noticed that alot of my peers were using tools like routing, as well as Postman for their HTTP requests. I didn’t use such things, and would like to learn of newer technologies to complete this project.


Well, that’s all for this time, thank you for reading.
if me – An Open Source Project

Hello, all. In this blog post, I will be describing an open source project that I found interesting. This project is called if me, as found here: https://github.com/ifmeorg/ifme

if me is an online community that allows people to easily share any mental health experiences with their ‘trusted allies’, in this case, peers, family members, mental health workers, etc. It allows users to share their experiences, as well as document their attitudes and daily moods, as stated on their website: https://www.if-me.org/. It solves the problem of saving and sharing mental health experiences in a safe, convenient way that enables your postings to be viewed by those you trust, as well as kept for future consultation.

While there is no date given, I’m assuming the project was started at least 2 years ago, judging by the dates on some of the Github folders. Aside from the code being on Github, the website is live and running at the link above.

It seems to be written in the following languages: Javascript, Ruby on Rails, React, and Flow. Currently, there are 71 open issues in the Github repo, with a total of 132 contributors.

Finally, it seems as there are many people using this project. The website appears to be very professional and thought out, with a lot of sections, such as a blog, an FAQ, and additional resources. The project has also received various funding grants, so I would imagine they have a decent amount of users using it for their mental health needs.

And thus, that concludes this blog post on if me. It seems like an interesting open source project, with some open issues that anyone can fix.